Showing posts with label UWP. Show all posts

Sunday, June 8, 2025

A quick guide to using Bluetooth serial ports from C#


Reading from classic Bluetooth serial ports isn't hard but does involve understanding 5 different classes and connecting them together. In this post, I'm show all the classes you need to make the code work, how to create or use them, and how they fit together. This walk-through will be in reverse order: I'll start with actually reading data and then work backwards through the classes. The recapitulation at the end will list the objects in forward order.

I use this code to connect to a small portable GPS device that sends National Maritime Electronics Industry (NMEA) formatted GPS information over a Bluetooth serial port device and translate and display the resulting messages in an easy-to-use app.

Starting with the DataReader class you need to read from your device, and ending up with the generic Device interfaces, here's the classes and objects you need to use your Bluetooth serial-port connected device.

Use a DataReader to read the data. 

Documentation DataReader:

Hints for using DataReader: call LoadAsync(count) to read from the serial port into the DataReader's internal memory and then ReadString() to get a string of the data. Be sure to set the InputStreamOptions to Partial. Partial means that whenever there's data the load will return. This is important because the serial port sends just a little data at a time.

Constructing the DataReader: construct the DataReader with the constructor that takes an IInputStream as a parameter

The IInputStream is from a connected StreamSocket. 

Documentation IInputStream:

An IInputStream is an interface for the concept of "getting stream of data (with no framing) from a specific source like a Bluetooth device or a network connection. You won't be calling any methods on it.

Getting the IInputStream: your IInputStream will be from a connected StreamSocket's InputStream property.

The StreamSocket is connected using data from an RfcommDeviceService objects

Documentation StreamSocket: 

Hints for the StreamSocket: StreamSocket is a single class that can handle multiple different type of connections. Common uses are for networking (where it's a classic TCP/IP network connection) and for Bluetooth classic. You'll just connect it and then use its InputStream property.

Constructing the StreamSocket: construct the StreamSocket with the default constructor with no parameters and then connect it using the RfcommDeviceService's ConnectionHostName and ConnectionServiceName. The hostname will look like "(00:19:01:48:4E:F5)" and the servicename will look like "Bluetooth#Bluetooth2c:0d:a7:c8:53:33-00:19:01:48:4e:f5#RFCOMM:00000000:{00001101-0000-1000-8000-00805f9b34fb}"

The RfcommDeviceService is from a BluetoothDevice object

Documentation RfcommDeviceService:

Hints for the RfcommDeviceService: The RfcommDeviceService is a little confusing because there's so much apparent overlap between a BluetoothDevice which supports an RfcommDeviceService. A good way to think of it is that my GPS Bluetooth serial device is the "BluetoothDevice" as seen by Windows. And the RfcommDeviceService is the serial port that could theoretically be connected to anything.

Getting the RfcommDeviceService: The RfcommDeviceService is gotten from the BluetoothDevice. There are two ways to do this: 

  1. Call the GetRfcommServicesForIdAsync()  method to get just the specific serial service you want. This lets you ask for a serial port and not, for example, an ObexFileTransfer. I know ahead of time that I want the SerialPort service, so I use this method to get just the right matching services (although I  think there will always be just the one)
  2. Call the GetRfcommServicesAsync() method get a list of all possible serial services and then pick your preferred service from it.

It's important to know that Device might support both the generic raw serial port as RfcommServiceId.SerialPort and might also support the more structured ObexFileTransfer. For my specific GPS device, it supports both the SerialPort and also the MFi/iAP(2) protocol. When I connect to the device, I see the NMEA messages, so it must be the right one.

BluetoothDevice object is initialized from a DeviceInformation Id

Documentation DeviceInformation:

The BluetoothDevice object that's used to get the RfcommDeviceService is used in the program to track device events like the connection being lost, and to ask for permission to access the device.

Constructing the BluetoothDevice: call the static BluetoothDevice.FromIdAync(deviceId) method, passing in the select DeviceInformation's Id property.

The DeviceInformation object is found with DeviceInformation.FindAllAsync(query)

The DeviceInformation object is used by the Windows device system to return information about devices in a Windows computer. A device can be an adapter, like a USB port or Bluetooth port, or a device like a video card or monitor, or an input device like a keyboard or mouse. 

Getting a DeviceInformation object. Devices are found using a query string in the Advanced Query Syntax (AQS) format. This format has no obvious documentation at learn.microsoft.com. The good news is that you can get pre-created strings for devices, so it's no great loss. Get a pre-created string from the static GetDeviceSelector() method on each device class. The methods often do not require any parameters; sometime they take in some kind of specialty parameter. For my program, I eventually need a BluetoothDevice, and I know it must be paired, so I use an AQS query string from BluetoothDevice.

Use the AQS string in the DeviceInformation.FindAllAsync() method. This returns a list of DeviceInformation objects. You'll have to look at each DeviceInformation object to decide which one to use. I often do a match using the Name property.

Hints for using the DeviceInformation: Most of code for reading and writing a Bluetooth serial port is very similar and can often be shared between your different Bluetooth projects. But matching a device is often unique to the device and will have to be changed for every program. It's best to not try to wrap the matching code into something "handier" or "easier to understand".

Recap: critical steps

Let's recapitulate the steps, but this time in the order you'll do it in your code. In these steps, names in UpperCase are classes and lowerCase are objects. 

The steps to reading from a Bluetooth serial device are:

  1. Get a DeviceInformation object by using an AQS string from a static device GetDeviceSelector() method and passing that AQS string to the static DeviceInformation.FindAllAsync() method
  2. Create a BluetoothDevice from the deviceInformation.Id property with the static BluetoothDevice.FromIdAsync() method
  3. Find the correct RfcommDeviceService from the bluetoothDevice.GetRfcommServicesForIdAsync() method.
  4. Construct a StreamSocket and then connect it with the rfcommDeviceService's ConnectedHostName and ConnectedHostService
  5. Get an IInputStream from the streamSocket.InputStream property
  6. Create a DataReader object with the DataReader constructor that takes an IInputStream as a parameter. Set the dataReader option to Partial
  7. Call dataReader.LoadAsync() to get some of the serial data from the device, and call dataReader.ReadString() to get the data as a string.


Thanks for reading, and good luck!

Sunday, April 14, 2024

XAML Style Dictionaries

Step by step: adding consistent styles to a XAML app

XAML has a useful feature where you can set up a single file with a bunh of "style" configuration for your XAML (UWP) app, and then use those styles everywhere in your app. The plus side is having a centralized style configuration: all your titles can be one size, and all your technical text has the correct font, and all. The downside is that getting it set up is buried in a blizzard of docs. There's a lot of ways to set up your XAML styles, and Microsoft wants you to fully understand each of them in isolation.

In this simple blog post, I walk through the steps of one way to add centralized styles to your app and then be able to use them everywhere.

Create an AppDictionary.xaml file. In your project, Add > New and add a XAML ResourceDictionary. Call is AppDictionary.xaml.

Add your first style. I tend to prefix all my centralized styles with a small "s" like "sTitle".

    <Style x:Key="sTitle" TargetType="TextBlock">
        <Setter Property="FontWeight" Value="Bold" />
        <Setter Property="FontSize" Value="24" />
    </Style>    

Update the App.Xaml file to include this:

    <Application.Resources>
        <ResourceDictionary>
            <ResourceDictionary.MergedDictionaries>
                <XamlControlsResources xmlns="using:Microsoft.UI.Xaml.Controls" />
                <ResourceDictionary Source="AppDictionary.xaml" />
            </ResourceDictionary.MergedDictionaries>
        </ResourceDictionary>
    </Application.Resources>

The XamlControlsResources is seemingly a new thing for the Toolkit; it's essential to make the toolkit work. At least, that what is looks like to me.


Original, bad way: Update every page and control to include the AppDictionary

    <UserControl.Resources>
        <ResourceDictionary>
            <ResourceDictionary.MergedDictionaries>
                <ResourceDictionary Source="AppDictionary.xaml" />
            </ResourceDictionary.MergedDictionaries>
        </ResourceDictionary>
    </UserControl.Resources>

This isn't as good as just updating the App.Xaml because you have to update every page. By updating the App.Xaml file, you do it just once. At least, that's what I think will happen. If I was really an expert on this stuff, I wouldn't have struggled with it for a couple of hours last night :-)

Use the new style.  In a textblock, set the Style to be {StaticResource sTitle}.

        <TextBlock Style="{StaticResource sTitle}">Thingy Data</TextBlock>

Now you're styling with style, and it just took one short blog post to replaces multiple lengthy pages of explanation from the learn.microsoft.com site!


Weird Error to be aware of:

In my original App.Xaml file, I had the <Style> items right there in the file and then had the Resource Dictionary. But that could only be made working XAML by adding a "x:Key=..." to the ResourceDictionary. For a long time, this worked fine, but when I updated to the latest Toolkit, I got the following error. 

Windows.UI.Xaml.Markup.XamlParseException: 'The text associated with this error code could not be found.

Cannot find a Resource with the Name/Key ExpanderHeaderBackground [Line: 100 Position: 26]'


As far as I can tell, the "x:Key" is needed because when you have <Style> items in the <Application.Resources>, it's like it makes a default <ResourceDictionary>. So when you make a second <ResourceDictionary>, you have to give it a name.

But that's just a guess. What I know is that when I got the above error, I had an x:Key in my <ResourceDictionary> that I used for including the <XamlResourceControls> and when I moved everything around so I didn't need th x:Key, my app stopped crashing.

Sunday, April 23, 2023

Hints on injecting input into Windows (use 'ScanCode' for Unicode!)

 Use ScanCode to inject Unicode characters!

Got a Unicode string and need to inject it using the InputInjector class? Wondering how to inject it since the InjectedInputKeyboardInfo class has a ScanCode and a Virtual Key but no Unicode char? It turns out to be easy!

In the InjectedInputKeyboardInfo class, set the KeyOptions to Unicode and then fill in the ScanCode with the unicode char. Since you've got a string, you'll make a list of InjectedInputKeyboardInfo items and then send them all with the InjectKeyboardInput method.

I know this works because my new keyboard will happily inject  Unicode strings like this: 😋👩‍👩‍👧‍👧!

Handy Links

MSDN learn.microsoft.com ScanCode
Old [UWP]InjectedInputKeyboardInfo with Unicode forum questions that says they have an answer (but don't say what it is): here. 


Monday, May 31, 2021

Filtering out distant Bluetooth signals

 TL/DR: nearby Bluetooth devices have a RawSignalStrengthInDbm in the 50s and 60s.

I love playing with Bluetooth devices and writing little apps to control them (including the very special Gopher of Things). One of the hassles with developing, though, is that we're in a sea of Bluetooth devices. Any "watcher" code you write will be inundated with events from everyone else's device (notably their Apple devices which helpfully send lots of Bluetooth advertisements)

So how to filter them out? Step 1 is to look at the RawSignalStrengthInDbm in your Bluetooth watcher's BluetoothLEAdvertisementReceivedEventArgs argument. I did a little experiment: all of the devices I was interested in coding for had a signal strength in the 50's and 60's. Everything in the 80's and higher was noise from the rest of the house.

Note, though, that the strength is in decibels. A strong signal is -50 and a weak signal is 89. To quickly return when the signal strength is too low, do this:

    const int filterLevel = -75;
    if (args.RawSignalStrengthInDBm < filterLevel)
    {
         return;
    }


In my test, this filters out most of the undesired signals.


Sunday, May 10, 2020

Entity Framework (EF), SQLite and UWP

What I learned by using Entity Framework (EF) in a UWP application

I'm writing a super nifty e-book reader program (because, why not?). Along the way I discovered
that Entity Framework (EF), the easy-to-use object-relation manager layer, is in fact a poor match to UWP.

How so? Let me count the ways!

Bundled and non-bundled SQLite

Let's start with this page: Getting Started with EF Core.  In it, we discover that there's two ways to use SQLite: we can either use the SQLite that's bundled in with Windows. Or we can, for no good reason, bundle in a copy of SQLite into our app.

Except: using the bundled SQLite, is actually a terrible, terrible idea. Why? Because thanks to other libraries, chances are you'll already have a Sqlite in your app. And using the NuGet package to use the bundled Sqlite in fact just causes validation errors down the line when you switch to Release mode to make an actual release.

Tracking and Non-Tracking


Moving on to tracking: when you build an EF query, you can be either tracking or non-tracking. The value to non-tracking is described here: a non-tracking query is faster. Except that it really, really isn't, especially in my scenario.

Here's the scoop: I'm building a book database. There's a list of books; each book has some "flat" per-book information (like a string for the title) and also has both embedded information (like an entire class with the book's current download status) and lists of embedded information (like the set of people associated with the book aka the author, publisher, illustrator).

When you make a query for books, you only get the "flat" data. If you want the embedded classes like the download data, you have to include that in the query with a ".Include(DownloadData)" in the query.

When I search, I want the search query to be as slim as possible. Every embedded thing that's added just makes the search slower (and it's already too slow!). But EF has a hidden saving grace: you can do a query with a "slim" search, and then for individual specific items, do a thicker query. EF will automatically return the same actual object for the thin and thick queries, just with most stuff filled in.

That's a total win! I can slim down my queries as much as possible to find books for the user, and then plump them back up when I'm displaying specific individual books.

Yeah, but remember that advice about tracking and no-tracking? Turns out no-tracking queries don't do any of the above. And they aren't actually any faster (at least as far as I can tell).

Release Mode is Really slow

This took a long time to figure out: for a while in my e-book app, pressing the "next page" button was slow. And it was 100% my fault; I did a little bit of investigation (following several red herrings along the way!), and made it totally zippy.

Then I compiled in Release mode. Release mode is normally much faster than Debug mode, but (surprise!), that's now how EF rolls. Release mode is very much significantly slower than Debug mode.

There's tons of information about this on-line, most of it too old to be useful.

And then I discovered that my next page button was taking 15 seconds and spiking the CPU to 25% usage. That's completely unacceptable for an e-book reader; next page should be 0.1 seconds at most. My assumption, of course, is that my fixes (see earlier) were the cause, but they weren't.

All of the slowdown was simply saving the current book position. It turns out that one of the things that really slow in Release mode is saving database changes to the database. Like, 15 seconds slow.

Change Tracking (INotifyPropertyChanged) is fast

The SaveChanges advice is a real winner. It turns out that SaveChanges is super slow in release mode even though it's blink-of-an-eye in debug mode.

Using the default SaveChanges strategy, AFAICT EF has to keep a shadow copy of all object, and then when you do a SaveChanges it has to traverse everything to see what's changed. Then it can write out just the changes.

I don't know why this is fast in Debug mode and slow in Release mode.

With the change, EF can track all of your object changes; database updates are then super fast.

The only downside is that the advice doesn't actually say how to set the ChangeTrackingStrategy. You do that by created an override of the OnModelCreating method in you DbContext class.

   protected override void OnModelCreating(ModelBuilder mb)
   {

     mb.HasChangeTrackingStrategy
         (ChangeTrackingStrategy.ChangingAndChangedNotifications);
   }


Understanding that there's queries and there's queries

A surprise (to me) in EF is despite this not being documented, it's really important to know where a query is happening. EF is an abstraction layer on a database; you have to know what is happening on the database (an .AsQueryable()) versus what's happening in the EF layer (an .AsEnumerable()).

Need to make sure that your search is returning a "plump" object? That has to happen on the Database side, not the EF side. But need to do a complex search (like people do!)? That's strictly on the EF side of the house. Searches are faster on the Database side, but on the other hand, they are also super flaky.

But wait, it's just a little harder. EF converts queries at run-time. It's easy to make a LINQ query that looks right, and matches a simple, intuitive understanding of how everything is working, but will fail at run time.

What's all this about a flaky search?

Sometimes people want to find stuff by an author ("Dickens"). To do that, you make a search string ("%Dickens%") and then use EF.Functions.Like(b.Title, likeSearch) for the compare. Unless, of course, your search string is blank; if you do that, then the likeSearch string is plain "%%" and for some reason, EF (or maybe SQLite) really, really hates search strings like that.

As matching for "%%" is hard to understand. Yes, in general you shouldn't do weird searches. But this one is pretty simple and unambiguous.

How big is my database?

The main book database starts off with 60K entries (because I'm including the entire Project Gutenberg catalog! It's awesome!). Each entry has 6 sub-entries (list of People, list of Files, Review, DownloadData, NavigationData and a list of Notes).

A typical book has about 4 People and 12 Files associated with it. The database when compressed is 32 megabytes and expands to 158 megabytes when installed.

Getting started: making the database

To make your first database, EF needs to scan your app, looking for the data context so it can build a bunch of scaffolding. This doesn't work with a UWP app. Your solution needs a second project which exists only to be a regular .NET app that EF can figure out.

Yes, this sucks.

Things to avoid: splitting the database


My e-book program has a big, read-only database of all Project Gutenberg books. First thought: use two database files, one for stuff that really is read-only, and then use a different database file for everything that the user enters.

So a book title, and the files that can be download is database #1, and the notes the user wrote is database #2.

Don't do this. EF has no support for it, and it will only make your life more complex without being actually useful. Stick with a single database.

TL/DR: things to watch for with EF, SQLite and UWP

  1. Run in Release mode early; it will catch surprise performance issues
  2. Track which things are Queryable (database) and which are Enumerable (EF)
  3.  Use the embedded database, not the built-in database
  4. Don't bother with .NoTracking
  5. Absolutely use INotifyPropertyChanged and ..Changing to go fast
  6. Complex searches and queries should be run on the EF side

Saturday, January 7, 2017

Measuring and Improving Variance in C# Task.Delay()

TL/DR: you can use both Task.Delay and SpinLock.SpinOnce() + StopWatch in order to delay by a precise amount while still allowing for a performant UI. 
Recently I tried to use the C# Task.Delay() in order to provide the delay in playing MIDI piano notes from old piano rolls that had been scanned in.  (Just playing the MIDI files didn’t meet my requirements for the project; I also wanted to animate the notes on a musical score and to highlight the notes on a virtual piano keyboard).  The results were disappointing: the resulting songs were musical, but with the note timings horribly off.
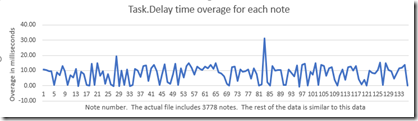
image

A quick investigation using the C# Diagnostics.StopWatch object showed why: the Task.Delay() was being asked to delay (in many cases) for 5 to 20 milliseconds.  MIDI are presented as a series of NOTE ON and NOTE OFF events; each includes a number of ticks to wait before performing the action.  In one typical MIDI file from a piano roll, there are 3778 notes with a median time to wait of 18.75 milliseconds; the Q1 point is 3.125 milliseconds and the Q3 at 62.5 milliseconds
Each call to Task.Delay() is not precise and often ends after the requested completion time.  This was called the “time overage” for the call.  The median time overage was 9.855 milliseconds with a Q1 of 5.3 milliseconds and Q3 of 12.34 milliseconds.  These overages were killing the musicality of the performance.
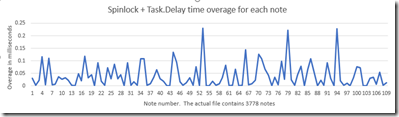
The first solution was to use a System.Threading.SpinWait lock for the correct number of milliseconds.  This worked as far as the music went, but the spin lock prevented the screen from being updated. 
The second solution was to do a Task.Delay() for each note except for the last 20 milliseconds of each note.  Each piano roll, as encoded by the MIDI files, includes plenty of longer requested time delays so that there are still plenty of Task.Delay() calls.  These calls enable the screen to stay refreshed.
The final data is quite pleasing.  The median time overage dropped from 18.75 milliseconds to a radically smaller 0.0188 milliseconds. 
image

Tuesday, April 19, 2016

The program that went “ding”!

I started with a simple requirement: build a timer program that, after 25 minutes, does a little “ding” sound, using the Universal Windows platform.

Making a sound is simple

The “make a sound” is simple enough; the fundamental API is the MediaElement, and it has a Play method that takes a stream.  Universal is a little awkward with streams; the final code:
  • Get the Windows.ApplicationModel.Package
    .Current.InstalledLocation
  • from the InstalledLocation do a GetFileAsync passing in the normal  @“\Assets\Sounds\ding.wav” format.  Note my use of the @ in front of the quote.
  • given the file do an OpenAsync()
  • On the MediaElement do a SetSource() of the stream
  • Finally, you can Play().

Except when you don’t have focus

Unfortunately this runs into two problems, both discovered by an end user.  Firstly, it won’t ding when the app isn’t the foreground. Secondly, it doesn’t ding when the app is minimized.  You might think this is the same problem, but it’s not.
To work in the background you need to set the AudioCategory of the MediaElement to BackgroundCapableMedia.  This won’t work until you’ve also registered some callbacks to control the sound level; this is a requirement of the Windows OS.  Since all my sounds are short, I cheated, and the callbacks do nothing.
As a short aside, the other option is Communications; it’s the only other setting that works in the background.  However, my ding sounds are too short and don’t work properly.  Existing music would be faded out so users could hear the sounds, but that happed too slowly; by the time my sound was faded in, it was already over.  [Update: I'm also told by People At Microsoft that the Communications settings is wrong, wrong, wrong unless you are actually a communications app]

Convergence problems

Except that this is not fully converged.  For the phone you have to add callbacks to Windows.Media.SystemMediaTransportControls (getting the current one with GetForCurrentView()); the two callbacks you need are PropertyChanged and ButtonPressed.  On Desktop, you add callbacks to Windows.Media.MediaControl and you need a callback for about six different things.

App Manifest Woes

This still doesn’t work; you need to update the Package.appmanifest to declare that you do background audio.  Here the blogs are simply wrong, and present XAML that works until you try to compile for RELEASE mode.
The correct XAML is:
<Extensions>
  <Extension Category="windows.backgroundTasks"
               
EntryPoint="DesktopCompanion.App">
    <BackgroundTasks>
      <Task Type="audio" />
    </BackgroundTasks>
  </Extension>
</Extensions>

Note the EntryPoint item; the blog posts about this all mention a StartPage, which is wrong in this context.
But we’re still not done.

Hidden windows, quiet timers

So we have a great solution, and the app will ding when it’s minimized.  We can even prove it; run the app, wait for the ding, run minimized, and wait for the ding again.
That test turns out to be flawed.  IF you start the timer and minimize it before it has a change to ding the first time, it won’t ding in the background.  You have to make a foreground sound first.
Solution: add  a very short quiet ding right when the app starts. 
I also discovered that setting the ding to be looping would solve the problem, but it seemed like the first go-around would not play and then the second and subsequent ones would.

Oh, so you like listening to music?

There’s one problem I haven’t solved.  If you do all this on the phone, the “ding” will automatically stop your music from running.  On full (desktop/laptop/tablet) Windows, the music will simply fade out, let the ding happen, and then come back.  On the phone it stops dead and doesn’t resume.
This might not be bad, but the ding is actually optional; you can run in muted mode.  I normally run muted; otherwise it would distract by work mates.
Solution:
  • Add a DingSilentlyOnce() that can do the silent ding
  • Call it at startup unless the user has the app muted
  • Call it when the user switches out of muted mode (either by pressing the mute button or by selecting a sound to play)
This still doesn’t solve the problem where the ding will stop my background music on the phone.

Conclusion

Making things go ding is only slightly painful until you need it to actually work, at which point four different changes are needed, none of which are properly documented.